How to Polish Guitar Frets: Step-by-Step Guide

How to Polish Guitar Frets
Smooth and responsive frets depend on well-polished guitar frets, and that is the major reason we need to know how to polish our guitar frets.
Indeed, the importance of smooth and responsive frets cannot be underestimated in playing the guitar. Of course, we can only achieve this if our frets are clean and smooth.
As we all know, the frets can get dirty and rough. So, we need to clean and polish it properly.
If our guitar frets get dirty, rough, and rusty, we don’t need to worry. The reason is that we can easily polish our guitar frets and bring them back to life. This is achievable with a little bit of time and effort.
In this blog post, we will be sharing step-by-step instructions on how to effectively clean and polish our guitar frets.
Whether you’re a beginner or an experienced player, this guide will help us get our frets in top condition. Because it will help us clean our frets properly and improve the overall quality of our guitar. So, let’s get started!
Why Do We Need to Polish the Frets?
Over time, dirt, grime, and rust can accumulate on our frets. This dirt causes them to feel rough and makes it difficult to play.
As a guitarist, we know how important it is to have smooth, responsive frets on our instrument.
Polishing our guitar frets is an important aspect of maintaining and improving the overall quality of our instrument.
This process helps us to remove any dirt, rust, or grime that may have accumulated on the frets over time. Basically, it leaves them feeling smooth and responsive.
So, by cleaning and polishing our frets, we can improve the overall quality of your instrument. We can also ensure that your frets are smooth and responsive.
Basically, a clean fret keeps our instrument sounding and playing at its best.
How To Clean and Polish Our Guitar Frets
There are different methods we can employ to polish our guitar frets. One is using superfine steel wool. The other method is to use sandpaper. These two materials will get us a similar result. We can also use both methods one after the other to get a better result. However, this depends on the level of dirtiness and rustiness of our guitar frets.
In this post, we will see the process of using these materials.
However, we need to take caution and guard our fretboard. This is necessary, especially if the wood is sealed, just like maple boards.
Normally, we can use fret guards for this purpose. Also, we can use masking tape to tape off our fretboard. This is not that effective because the masking tape is easy to tear.
Finally, we should properly wipe off any residue or particles left behind by this process.
Below is a step-by-step guide on how to effectively polish the frets of our guitar.
Materials Required for Cleaning and Polishing Our Guitar Frets
Cleaning and polishing a guitar fret require a few materials to effectively get the job done. Basically, we will need the following materials to clean and polish a guitar fret:
- Soft cloth
- Guitar fretboard cleaner (optional)
- Fretboard Oil (lemon oil, optional)
- Steel wool (0000 grade)
- Sandpaper (600, 1200, 2400, 3600, 8000, 12000 grits)
- Polishing compound
- Microfiber cloth or polishing cloth.
Using these materials, we can effectively clean and polish our guitar frets. As a result, we will keep it in top playing condition.
Take Out the Strings.
The first step in polishing the frets of our guitar is to remove the strings.
So, we should rip the string off of the guitar that we wanted to polish its fret. So the fretboard will be open, and we will be able to polish the frets easily.
Normally, we need a free and unobstructed fretboard to have direct access to the fret we want to clean.
Be aware that there is no other way we would be able to properly polish than to remove the strings. We would not be able to polish the fret properly if we left any of the strings on the guitar.
After we have removed the strings, we should put low-tack tape on the bridge posts. This is done just to keep the bridge from moving, and there is no string tension to keep it in place.
Clean the Fretboard
After the strings have been removed, what we are going to do next depends on the wood our fretboard is made with. If it is maple, rosewood, or ebony, we need to know.
But before we start polishing our frets, it is important to clean the fretboard. This will help to remove any dirt, grime, or oils that may have accumulated on the surface. Basically, this will make it easier to see the results of your polishing.
The cleaning now depends on our guitar fretboard wood. If what we have is maple, we should be careful of what we use on it.
Specifically, we do not need any liquid solution to lubricate the dirt and clean the board. A thorough wiping of the fretboard with a clean cloth alone will do.
But if our fretboard is Rosewood, Ebony, or Pau, we can apply any good commercial guitar fretboard cleaner to clean it.
We should just use a clean cloth and some fretboard cleaner to gently clean the fretboard.
If our frets are really messed up, rusty, and well stained, we can use an alcohol prep pad or another product like that. Good cleaning can be achieved with it by using our fingernails to work it a little bit.
But it is advisable to use something milder because we need to consider the finish of our guitar. Specifically, if our guitar fret is not seriously bad, we should not use any alcohol product on it. A good commercial fretboard cleaner is ideal for this purpose.
Apply Fretboard Conditioner Oil to the Fretboard.
After we have completed buffing the frets, we should use a clean cloth to apply some oils to the fretboard. The oil should be commercial fretboard conditioning oil.
This will help us condition the fretboard. It will also help us prevent the fretboard from cracking.
Be sure to apply the conditioning oil evenly and avoid applying too much. The reason is that too much oil can cause the fretboard to become slippery.
The Fretboard Oils
We should be aware that commercial fretboard oils are the best way to clean our guitars. These oils are manufactured and sold by well-known luthier companies.
These guitar manufacturers produce products that will not damage their customers’ guitars through well-grounded research. As a result, most of their products are reliable.
The most common fretboard oil sold by these guitar companies is guitar lemon oil.
These oils are not pure lemon oil but mineral oils or neutral oils. These oils are pretty good conditioners for the guitar freeboard. However, they may have a small mix of real lemon oil. It is usually yellow due to the artificial colouring used to boost the look of the product.
Do not use any other oil on your fretboard if you don’t want to damage it. These commercial solutions are prepared to safely clean the fretboard. They are safe, cheap, and last.
One bottle did not cost so much, and you can use it for years.
Cover the Fretboard

After we have finished cleaning the fretboard and the frets, the next step is to cover the fretboard and the body of the guitar.
We definitely need to cover and protect the fretboard. This can be achieved with either masking tape or a fretboard guard.
This material will cover the wood surface of the fretboard and only expose the fret.
Note that rosewood is very easy to clean up and oil, and we may not need to tap it off. But we should always protect our fretboard to keep it neat and clean.
Masking off our fretboard or guiding it with a fretboard guard is a good way to protect the fretboard. But taping off the fretboard with masking tape is the old way of protecting the fretboard.
The current way of protecting the fretboard is by using the fret guard. The fret guard is a special-shaped metal used to guard the fret and protect the fretboard.
We can get the fret guard from any guitar kit supplier. The fret guard is good for a rosewood board, an ebony board, or even a maple fretboard.
But while using the fret guard, we should ensure it lies flush against the slightly curved fretboard.
Use Steel Wool

This step is necessary when the fret is seriously dirty or rusty. Basically, it will assist us in preparing the fret for proper polishing.
Generally, superfine steel wool is well-known for removing rust. Using steel wool will help us to remove any dirt, grime, or rust from the fret. The extra-fine steel wool (grade 000) is well suited for this job.
What we need is just a small piece of steel wool, but the steel wool gets little flakes, and we can get a splinter from it. For that reason, we need to protect our fingers with gloves.
So, we gently rub the steel wool on the frets to remove any dirt, grime, or rust. We should begin with light pressure and gradually increase it as needed.
Also, we should be sure to move in the direction of the fret and avoid circular motions. The reason has been that circular motion can leave marks on the frets.
After we have completed the process, wipe down the frets with a clean cloth to remove any residue from the steel wool.
Also, we should clean the flakes from this process immediately after we finish using the steel wool on our fret.
This can be done with a vacuum cleaner. Also, we can use magnets to pick them up by carefully running them over our workspace.
But we should not use steel wool to clean or polish our electric guitar. The reason has been that the steel wool fibres will find their way into the pickups and damage them over time.
Sand The Frets with Sandpapers
The next thing is to use sandpaper and polish the fret, provided it is heavily rusted, and we have cleaned it with steel wool.
So, after we have done with the steel wool, we should try and use a series of grits of sandpaper we can find.
However, if the fret is not that dirty or rusty, we can skip using steel wool and go straight to sanding it.
Basically, we sand the frets using sandpaper of different grits to directly or further remove the dirt or rust on the fret and polish it.
We should use sandpaper that has a fine grit between 600 and 12000. The higher the grit rating, the finer the grit of the sandpaper.
The finest grit will help us get the smoothest possible frets, and it should be used last to polish the fret to shine.
The best way to do this is to start with the coarsest sandpaper ( like 600 grit). Then we gradually work our way up to the finest sandpaper ( like 12000 grit).
Fret Sanding Techniques

There are better ways to sand each of the frets on our guitar. Basically, we should sand each fret in the direction of the fret and avoid circular motions.
In addition, we should ensure we sand each fret evenly and apply even pressure. This is to avoid leaving marks on the frets.
The reason we need to do this is to avoid the score mark that can impede our playability after polishing the fret.
For instance, if we were to bend the string across the fret, we would feel the effect of the score mark created on the fret by the sandpaper grit.
But we need to feel super smooth whenever we are bending the string. That is why we need to apply the sandpaper in the direction of the fret and not in circular motions.
Then we will finish sanding the fret with the finest sandpaper, which will buff the score mark off and thoroughly smooth the fret surface.
Buff the Frets
After we have properly sanded the frets, we will clean the fretboard and the metal by wiping them down.
Then, we will apply some polishing solution to a buffing rag or pad and buff the frets to a shine.
We must begin with light pressure and gradually increase it to medium as needed.
To properly do this, we should move the cloth in a circular motion. The circular motion will ensure that we are buffing the frets evenly.
As we buff, we’ll see black gunk appearing on the buffing pad and sometimes the metal, which is mostly the metal oxide being removed.
Of course, this will help to remove the gunk or any remaining residue from the sandpaper. Also, it will give the frets a smooth and shiny finish.
Once the gunk is removed, we’ll wipe the metal down again with a clean microfiber cloth. If we are satisfied with the results, we will stop there.
If we’re not okay with it, we’ll apply more polishing solution and continue buffing until we’re happy with the result.
The Polished Guitar Frets
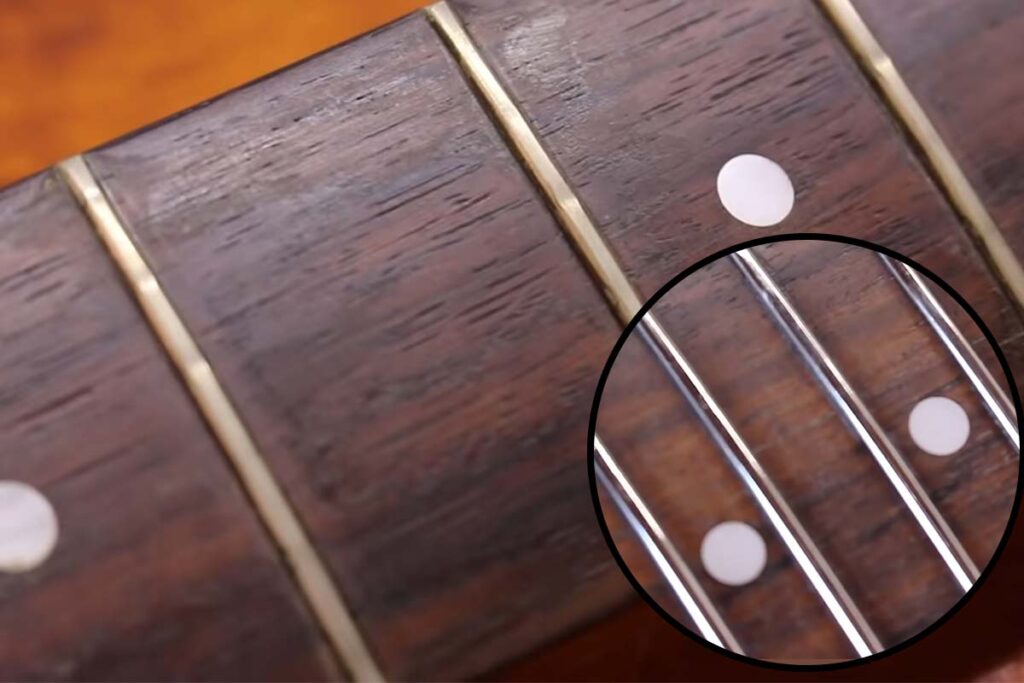
After the fret has been properly polished, we can see that it is bright, smooth, and gleaming.
For instance, look at the picture above and see the difference between the polished fret and the dirty and unpolished fret.
As we can see, there are glimmers of shine on the polished frets inside the circle. On the right side, there are four frets embedded in a circle.
The difference is obvious to the eye.
Absolutely, after we have finished polishing all the frets, we will have a smooth, nice, and shining fret.
Also, due to the polished frets, the playing feel of the guitar will be a lot better.
Final Taught on How To Polish Guitar Frets
As we can see, polishing your guitar frets is a simple process that can be done in just a few steps.
In this post, we have covered everything we need to know about polishing our guitar frets. These include what materials we will need and how to clean the fretboard.
Also, we covered the proper techniques for sanding and buffing our frets. Besides, we talked about the importance of conditioning our fretboard with lemon oil after polishing.
By following the steps outlined in this guide, we can remove any dirt, grime, or rust that has accumulated on our frets. As a result, we would leave them feeling smooth and responsive.
Absolutely, with a little time and effort spent in cleaning and polishing our frets, we can improve the playability and overall quality of our guitar.
But it is important to take our time and work carefully to avoid causing any damage to our frets or fretboard.
With this knowledge, go ahead and start polishing your guitar frets to your satisfaction. If you have any information you want to share with us, please feel free to do so in the comments section below.
At Phamox Music, we go all out for exactness and honesty. For this purpose, if by any means you found any possible glitch, be it factual, editorial, or something that we need to update, kindly contact us.
If you find the information provided in this post, “How To Polish Guitar Frets,” interesting and helpful, kindly share it with someone you know who might need it.