Everything You Need to Know About Violin Bow Rehairing

Violin Bow Rehair
When it comes to maintaining the optimal performance of a violin bow, one task that stands out in importance is violin bow rehair.
This delicate and meticulous process involves replacing the worn-out horsehair on the bow.
Undoubtedly, this process rejuvenates the bow’s responsiveness and enables it to produce beautiful melodies once again.
Imagine the luthier as an artist and the violin bow as their canvas.
They skillfully renew its magic by taking each strand of horsehair and weaving it precisely, like creating an intricate pattern.
Violin bow rehair infuses new life into the bow, enabling it to glide effortlessly across the violin strings.
Understanding how to rehair a violin bow helps us appreciate how important it is for keeping the instrument in good shape.
In this blog post, we will learn about how rehairing works, signs that show when it’s time to rehair, and the good things it brings for both the musician and the instrument.
Get ready to uncover the secrets of this special skill that unlocks the full potential of your violin bow.
Have you ever wondered how a violin bow is rehaired? I was once like that, and I can tell you the process required meticulous skill and attention to details.
The Violin Bow Hair
Violin bow hair is the part of the bow that makes contact with the violin string surface when bowing and playing a violin.
The hair on a violin bow is unique because it comes from a bunch of horsehair.
The horsehair is meticulously chosen for its flexibility, resilience, and ability to grip the strings.
These hairs are all connected to form a long ribbon. It’s amazing to think that a single bow can have approximately 160 to 180 individual hairs.
This is the very essence of the bow’s sound-producing mechanism.
But here’s something interesting: before they use the hair, they meticulously remove any hairs that are too thick or have kinks.
They make sure that only straight hairs are selected for the bow to create balance between the bow hair and the strings.
The delicate balance between the bow hair and the strings allows the musician to produce a rich and resonant tone.
Why Do We Need to Rehair a Violin Bow?
Continuous use and contact with the strings over time cause wear and tear on the horsehair on the violin bow.
This wear and tear diminishes the grip between the bow and the strings, resulting in a loss of sound quality.
Here’s something important to know: the horsehair on a violin bow has tiny scales.
These scales undergo wear and tear over time as the bow is used and rubs against the strings. As a result, the hair loses its ability to grip the strings effectively.
This condition affects the overall quality of the instrument’s sound. The reason is that the bow finds it difficult to create a consistent and resonant sound.
The sound may become dull, uneven, lack projection, and be less satisfying.
To address this issue, musicians apply rosin to their hair. However, over time, the hair becomes smoother and accumulates dirt from the rosin.
This buildup of rosin and dirt reduces the effectiveness of the hair and adds to the wear and tear on the bow.
This also makes it more challenging to produce a clear and pleasant sound.
The reason is that the dirt makes the hair less responsive and reduces the control and articulation that a musician has over the instrument.
Therefore, it is necessary to rehair a violin bows to combat this wear and tear and restore their performance.
When To Rehair a Violin Bow?
The timing for rehairing the bow varies depending on different factors and the condition of the bow.
Specifically, the type of music played with the violin and how frequently we use it are major factors in determining when to rehair the bow.
Additionally, the quality of the horsehair we use and our daily care routines also contribute to the decision of when to rehair the bow.
However, a clear indication that it’s time to rehair the bow is when the hair no longer produces a great sound on the violin. It is important to find the right time to do this.
Professional violinists who play regularly may need to have their bows rehaired every three months to one year. This ensures they can maintain optimal performance and create beautiful music.
On the other hand, hobby players may keep the same bow hair for longer periods, such as five years or more. This is possible if they take proper care of their bow hair, and it still produces a satisfying sound.
It’s important to understand that there isn’t a set time for rehairing a violin bow.
The frequency of rehairing depends on various factors, such as how much you play every day, the kind of music you play, and how well you take care of the bow.
If the hair on the bow still looks nice and creamy or white like before, and it tightens up well when you twist it, and when you put rosin on it, it sounds good and allows you to play without any problems, then you might not need to get a rehair just yet.
Violin bow rehair is all about ensuring the bow is in good shape and works well for you.
Who Should Rehair the Violin Bow?
While some experienced string musicians learn to rehair their bows on their own, most musicians prefer to take their bows to a professional.
The truth is, achieving a truly excellent violin bow rehair is not an easy task. It takes years of dedicated training and regular coaching to learn how to do it properly and minimize the risk of damaging the bow.
In our opinion, it is better to have the violin bow rehaired by a professional luthier who has the technical know-how rather than attempt it yourself.
So, if you haven’t found a luthier (bow repair expert) you trust yet, you can ask your music teacher or a local music shop for a recommendation.
As mentioned earlier, rehairing bows is not as simple as it may seem.
Why Entrusting Violin Bow Rehairing to Experts is Essential
Entrusting a professional luthier with your violin bow rehairing is essential because they possess the specialized knowledge and skills to carry out the task effectively.
First and foremost, professional luthiers have honed their expertise through years of education, training, and practical experience.
This deep understanding of violin bow rehairing enables them to handle any complexities or challenges that may arise.
By relying on their expertise, you can be confident that the rehairing will be performed with competence and professionalism.
Additionally, professional luthiers have access to valuable resources not readily available to individuals attempting the rehairing themselves.
They have the necessary tools, materials, and access to quality bow hair, ensuring a more successful and satisfactory outcome.
Another advantage of entrusting your bow rehairing to professionals is their ability to save time.
With their experience and efficiency, they can carry out the rehairing process promptly while maintaining the quality of their work.
Lastly, professional luthiers are dedicated to delivering a high standard of quality.
They take pride in their work and strive to ensure that every rehairing is executed to the best of their abilities. Their attention to detail and commitment to excellence contribute to a successful and satisfactory outcome for your bow.
How to Rehair a Violin Bow
When it comes to entrusting your precious violin bow for rehairing, it’s crucial to find a skilled professional who can handle the task with expertise and care.
But if you are someone dedicated to taking on “Do It Yourself” projects and interested in learning how to rehair bows on your own, the next section of this blog post will provide you with a step-by-step guide.
Many string musicians initially consider rehairing their own bows to save money.
However, it’s important to note that replacing bow hair requires specialized skills and specific tools. This means there will be an additional investment involved.
Taking all of this into consideration, you may find compelling reasons to entrust this task to professionals.
But if you still wish to proceed with rehairing on your own, we recommend purchasing a high-quality used bow that you can use for practice.
This way, you won’t risk causing permanent damage to the bow you typically use for practice and performances.
Furthermore, we suggest starting with a less expensive synthetic bow hair option, such as a vegan synthetic alternative.
These synthetic options are designed to address common issues associated with traditional horsehair, such as breakage, sensitivity to humidity and temperature, consistency, and premature wear.
A Step-by-Step Guide to Violin Bow Rehairing
Violin bow rehairing is a delicate and precise process that requires expertise and attention to detail.
Learning how to prepare and rehair the bow hair of a violin is an important skill for any musician.
This is part of a violin bow’s maintenance, which ensures optimal performance and awesome sound quality.
In this guide, we will break down the process into simple steps, so you can understand how to prepare and rehair your violin bows effectively.
Let’s delve into the step-by-step guide to understand the intricacies of this transformative art.
Step 1: Inspecting the Stick
The first step in the rehairing process is checking the bow stick for any damage, like a break or wear.
The reason is that any breaks or wear on the bow stick can affect its structural stability and functionality.
If there are any existing damages, they should be addressed and repaired before proceeding with the rehairing process.
This ensures that the bow is in optimal condition and can produce the best sound when used with the violin.
Therefore, we need to take a close look at the bow stick to check for any damage or wear.
We should also ensure that the stick is in good condition before proceeding with the rehairing process.
Step 2: Cutting and Removing the Old Hair

The next step in the rehairing process is the removal of the worn-out hair. This is done by carefully loosening and removing the old hair from the bow, ensuring that no damage is caused to the bow’s structure.
So, we should carefully cut the old hair, leaving around 4 inches at each end. This process is fast and easy to perform.
Alternatively, we can remove the frogs of the violin from the stick to set the hair free.
Either way, we will also need to remove the bow hair (the full one or the remaining inches from cutting) from the metal ferrule and the tips of the bow head completely.
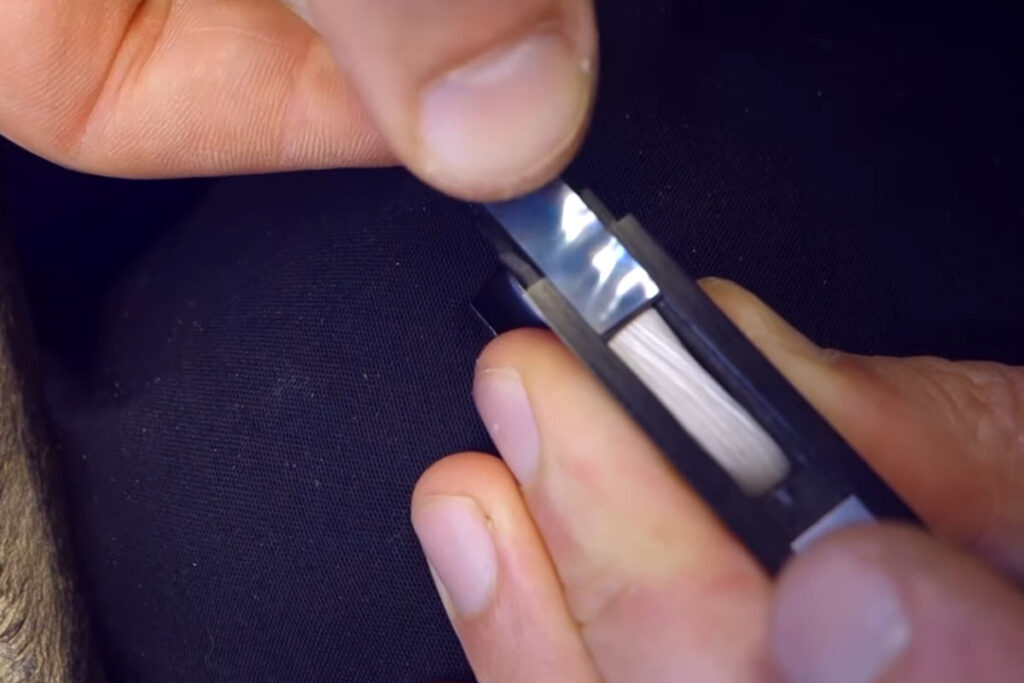
So, we will remove the slide and metal ferrule to remove the bow hair completely from the frog.
The metal ferrule fits tightly and requires careful removal.
This is usually done by firmly holding the ferrule and flipping it out of the frog in the left and right directions.
Remove the Ferrule and Free the Hair
We need to be very careful and use the right tool when removing the metal ferrule to avoid scratching it. The best tool for this is a good bench vice.
So, use a vice with a thick layer of padding and apply minimal pressure to hold the ferrule in place.
Then, pull the frog backward in a straight direction to separate the ferrule from the frog.
However, if it’s slightly stuck and you can’t remove it easily, try adding some sideways motions. Avoid moving the frog up or down to prevent damaging it.
When the ferrule is completely removed from the frog, the next step is to remove the wooden wedges that secure the hair inside the frog and the pearl slide.
Remove the Wooden Wedges and the Slide
Before we can remove the pearl slide, we need to take out the wooden wedge that keeps the hair in place inside the frog.
To do this, we carefully slide a knife between the wedge and the bony tongue.
We place the flat part of the knife on the ribbon side and make sure to have a finger on the other side to handle the pressure. Then we gently remove the wedge.
Once the wedge is out, we can proceed to detach the pearl slide from the frog.
To accomplish this, we firmly hold the frog on the sides with two fingers of our weaker hand and use our thumb from the stronger hand to push the slide away and out of its position on the frog.
The final step is to use a chisel to remove the wooden wedge that firmly holds the hair inside the frog.
So, we need to fold the hairs back to reveal and remove the frog-end plug.
This part may not be too difficult, but we need to be cautious about the chisel slipping.
If it slips, it can cause damage to the frog or even hurt our fingers.
So, it’s important to approach this step with controlled and safe movements of the chisel to ensure the plug is removed without any accidents.
Using the same method, securely hold the head of the bow with a padded vice and carefully remove the wedge that holds the hair firmly inside the tip plate.
By following these steps, you have successfully removed the hair from the bow, and now you can proceed to install new hair.
Step 3: Remove and Clean The Bow Components
Once the old hair is completely removed from the bow stick, the next step is to thoroughly clean and prepare the bow for rehairing.
This involves cleaning the bow stick and the frog, removing any traces of rosin or debris on them.
We should also clean the metal parts of the frog and button, including the winding.
If the thumb grip is loose, we need to apply glue to secure it. To achieve this, remove the tip block and clean the stick thoroughly.
Adjust the snugness of the frog if needed. Clean up the ferrule ring and pearl slide.
Additionally, we should remember to lubricate the slide slot with graphite from a pencil for easier removal next time.
Cleaning these components is crucial to ensuring the proper functioning of the bow.
The reason is that dirt or debris that accumulates on the frog or stick can get into the hair and hinder the bow’s movement and flexibility.
By cleaning the other components of the bow, we prepare the bow hair for smooth operation and optimal responsiveness after rehairing.
Step 4: Replacing the Block
After the frog has been carefully cleaned, the metal parts have been polished, and the channels for the slide have been lubricated using graphite from a pencil, the next step is to create a new plug or block. This plug, or block, will be used to secure the hair in place.
To do this, you will need a rectangular piece of wood that is approximately 5 millimeters high and 12 millimeters wide.
Make sure to cut the wood in a way that follows its natural grain, allowing the sides of the plug to fit into a slightly smaller hole.
It’s important to maintain the same length of the plug and prevent any shrinkage when it is pressed.
The wood commonly used for making plugs is called maple, which is also used to build violins.
Now, cut the new plug or block to match the length of the block mortise, taking into account the thickness of the hair.
Use the same method to create the head block for the head mortise.
If the block you removed is still in good condition, you can reuse it to secure the new hair. However, using a new block is generally the preferred option.
Step 5: Hair Selection and Tying
Having created the plug to be used for both the frog and head, the next step is selecting the correct amount of horsehair for the bow.
We should ensure that the strands we have selected are of good quality. Then, we need to align and measure them properly to ensure uniformity in length.
Once we have chosen and measured a high-quality hank of hair, it is important to securely tie its end with a strong thread.
Tightly tie the hair using strong thread made of a blend of cotton. We can use three clove hitches, which is a self-binding knot, and finish it off with a reef knot.
Moreover, ensure that the length of the hair matches the size of the block mortise hole. Cut the hair, dip the end into crushed rosin, and burn the end.
Burning the end of the hair will help us position the knot inside the mortise more easily.
Then, insert the hair into the block mortise hole, making sure it lies flat and fits securely.
Step 6: Attaching the Hair to the Frog

After properly tying the hair and burning its end, position the knotted side of the hair inside the mortise. Once the knot is inside the mortise, press it firmly with the end of a file.
The knot doesn’t have to be parallel to the bottom of the mortise, but try to get it as close as possible.
Next, apply crushed rosin to the end of the plug or block you want to use. Then, place the plug into the mortise hole to securely hold the bow hair in place.
Start by placing the plug in a proper position, starting with the front, and pressing it down with your finger.
For better pressure, we can use a flat file with teeth on the side to carefully press down the back of the plug inside the mortise, making sure not to slip.
However, if the plug is too long and cannot be forced inside, we need to cut it. We can use a knife to cut a bit off the back.
On the other hand, if it’s too loose, we will need to make a new plug that is longer than what we have.
Above all, we should ensure the block fits well into the mortise and securely holds the hair in place.
After that, flip the hair over the plug. The hair should fit tightly inside the mortise hole and not be able to move.
We can confirm this by giving the hair a gentle tug. This will let us know if the hair fits tightly into the block or is able to move.
Step 7: Push In the Slide and the Ferrule
The next step is to reattach the slide to its slots on the frog. To make sure the hair doesn’t go sideways and cause any problems with the slide, twist the bundle of hair and slide the frog slide in.
While sliding, hold the slide down against the hair, and then gently push the slide along its track.
After the slide has been put into its slot, we also need to reinstall the ferrule in its place.
To put the ferrule back into its slot, there’s a trick to make it easier.
Start by placing a thread under the hair and gathering both ends of the thread.
Then, pass the ends of the thread through the ferrule and pull them to bring the hair through the ferrule.
Once the hair is through the ferrule, carefully push the ferrule back into its place. Make sure the hair is evenly spread across the edge of the ferrule.
By following these steps, you can successfully reattach the ferrule and ensure the hair is in the right position.
Step 8: Insert the Top Wedge of the Frog
The best way to handle this is by making a new wedge. While some people may reuse wedges, they often don’t fit well, so it’s better to create a new one. So, the next step is to cut and carve the top wedge.
8a: Cutting the new wedge
To start making the wedge, cut the wood piece from one side to the middle.
Cut it at an angle that matches the shape of the ferrule, so the wedge is easily visible.
If you prefer, you can use a file along with your knife to shape the top and reduce each side.
Once you finish making the new wedge, it’s time to insert it to hold the bow hair.
Place a thick piece of leather on your workbench and stand the frog upright on it.
Then slide the hair sideways and use your finger to ensure it spreads evenly, forming a regular band of hair.
Next, insert the wedge and check if it fits properly. The wedge should have the exact shape of the space it’s filling.
When you achieve the right shape for the wedge, it should fit tightly and keep the hair evenly spaced.
8b: Insert the Wedge
Before fixing the wedge in place, add a few more hairs to the corner of the plain side so they fit into the cut you made on the wedge.
Then, hold the hair in the correct position and apply some glue.

You can use any glue that can be washed away with water and makes it easy to remove the ferrule during the next re-hair.
White glue is a good choice because it doesn’t stick to the hair, is easy to clean, and is safe for the frog. It’s also soft enough to prevent the glue from breaking.
Afterward, use your fingers to push the wedge inside and add more glue directly to the wedge.
Then, push the wedge all the way in using a small hammer or any other suitable tool you have. The hammer helps ensure the wedge is perfectly upright.
Step 9: Attaching the Hair to the Head
Attaching the hair to the head of the bow is a crucial step in the rehairing process.
It requires precision and care to ensure that the hair is securely attached and properly aligned.
This section will guide us through the step-by-step process of attaching the hair to the head of the bow during the rehairing process.
Soak And Rinse the Horsehair

Moving forward, we will fill a small bowl with clean, clear water and soak the lower part of the hair bundle in it.
It’s important to ensure that water doesn’t reach the frog, so we need to keep the frog away from the water. This is very important to prevent any damage to the frog.
Afterward, allow the hair to soak in the water for approximately 10 to 15 minutes.
This will give enough time for any chemicals in the hair to naturally dissipate.
Once the time has passed, take the frog in one hand and use the other hand to gently press and slide your fingers along the hair to remove any excess water.
Next, attach the frog to the bow and secure the stick in a padded vice, using the winding or lapping part of the stick while turning the frog upside down.
This step will position the frog in its resting position. The padding on the vice will also ensure the bow remains scratch-free.
Now we are all set to comb the hair.
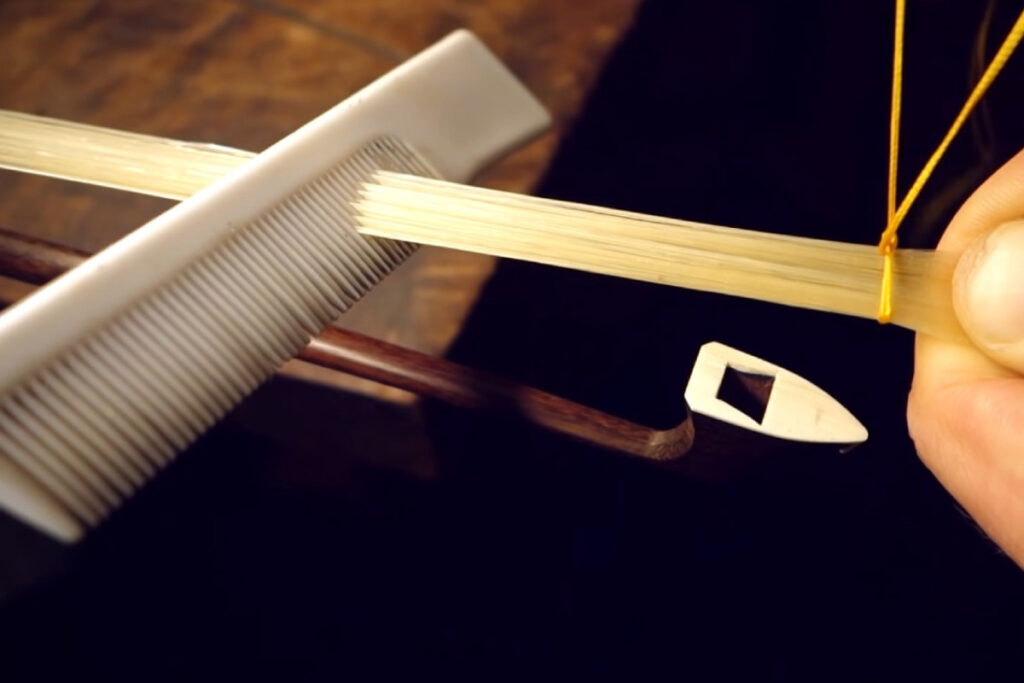
Comb the Hair Out
After properly positioning the frog upside down and securing the stick, the next step is to carefully comb the hair.
Position yourself comfortably beyond the head of the bow and start combing the hair from the frog in the tip direction.
Gently pull the hair with the comb, and if the comb gets stuck, remove it and place it just after the hair knot. Repeat this process until you reach the end of the hair.
Once you reach the end, return to the frog and begin combing the hair again.
If you encounter the hair knot, remove the comb and reposition it just after the point where you got stuck.
Gradually repeat this process, and the knot will loosen as you progress towards the end of the hair.
Continue with this technique until you can smoothly comb the hair from the frog to the end of the hank in one continuous motion.
Once this is achieved, it’s time to insert and securely pin the hair into the head mortise.
Tie and Knot the Hair at the Tip
After successfully combing the hair from the frog to the other end of the head, let’s move on to the next step of tying the second knot, which can be more challenging.
To start, measure the depth of the head mortise and mark it on the tip plate, starting from the wider edge of the mortise.
This will serve as a reference point to ensure that the knot finishes at the marked location on the tip plate.
The objective is to have the hair properly done and dried, with the bow tightened, while ensuring there is no tension on the stick.
However, we should also avoid having the hair too long, as excessive tension can negatively impact the bow’s curve, frog, and head alignment.
To prepare the thread and tie the knot, follow the same process used for the frog side.
Hence, hold the hair flat and tight, avoiding excessive pulling. Begin tying the tip by encircling the hair to create the first knot.
Create a second knot to secure the first one, but this time refrain from going around the hair.
Be cautious not to apply additional tension to the hair, as it may not be strong enough to withstand pulling.
Then, go around the hair again and complete the knot.
After tying, trim any excess hair and tamp the end into crushed rosin before using a flame to seal the tip of the hair.
Once you have completed these steps, it’s time to securely insert the hair tip into the head mortise and pin it in place.
Pin Down the Hair into the Head Mortise
At this point, release the frog from the bow stick. Flip the frog over and comb through the hair from the frog side towards the head knot using a comb.
Ensure that your hand positioning aligns with the frog, and remember which side of the hair strand corresponds to the frog.
Gently grasp the tips of the hair firmly and ensure they are properly aligned with the frog.

Then, use your other hand to hold the bow stick and position the head for the hair.
While holding the bow head, position it in the same manner as we did for the frog earlier.
Then, carefully insert the knotted part of the hair fully into the head mortise until it reaches the bottom.
Next, insert the plug into the mortise, but refrain from pushing it all the way in. We need to leave some space at the bottom.
Once you have completed that step, flip the hair over the tip and secure it in place using your finger.
Afterwards, place the front of the plug into the hair and use your finger to push the back of the plug forward and downward.
To ensure a secure attachment of the plug, use a tool such as a file to properly push it in. Begin with the flat part of the file, and as you approach the ivory tip, change the file’s angle to the side.
Typically, one side of the file is smooth, while the other side has teeth.
Remember to use the side with teeth for a better grip. If you feel that you are applying excessive force, trim a small portion from the back of the plug.
If the mortise is not deep enough, you can lower the height of the plug or further shape it using a small gouge.
Step 10: Final Assembly and Adjustment
Now that you have attached the hair to the head, place one finger in the middle of the hairband and slide it through the frog.
Then, twist the hair to ensure it is properly secured.
After completing that step, position the frog in its correct place on the bow stick and fasten the button by screwing it in.
When the button reaches its position, give it three turns to apply moderate tension to the hair.
Step 11: Finishing Touches: Dry the Hair and Apply Rosin
Subsequently, allow the hair to dry under that tension for a minimum of two to three hours, or preferably longer if possible.
This will aid in drying, stretching, and achieving even hair distribution.
Once the hair is completely dry, you can untie the bow and apply some rosin, but make sure the hair is dry before doing so.
I personally suggest avoiding the use of rosin powder, but the choice is ultimately yours.
Lastly, check for any loose or hanging hairs and avoid using a flame to straighten them, as it can have negative consequences.
Instead, focus on honing your skills to achieve a flawless outcome.
At this point, we have rehaired our violin bow, and it should be ready for use.
However, after completing the rehairing process and applying the appropriate amount of rosin, we may notice a slight difference in its feel.
It is common to experience this outcome after rehairing a violin bow.
Nevertheless, with some practice and by making minor adjustments to our bowing technique or pressure, we will quickly regain our usual playing experience.
FInal Note
When the hair on a violin bow becomes worn out or damaged, it’s time to rehair it. Rehairing the bow involves replacing the old hair with fresh strands so that it can work its magic on the strings once again.
Rehairing is like giving your bow a makeover. A skilled professional carefully removes the old hair and attaches new strands using special knots. This process ensures that the bow produces a beautiful sound when played.
Just like getting a haircut, rehairing is a regular maintenance task for violinists. It helps keep the bow in excellent condition and ensures it performs at its best. So, if you notice your bow hair getting tired or worn, there’s no need to worry! You can find a way to rehair it yourself, or even better, take it to a trusted violin shop where they will expertly take care of the rehairing process for you.
By giving your bow some fresh hair, you’ll be ready to create more magical music and continue your violin journey with a bow that’s ready to shine!
At Phamox Music, we go all out for exactness and honesty. For this purpose, if by any means you found any possible glitch, be it factual, editorial, or something that we need to update, kindly contact us.
If you find the information provided in this post “Violin Bow Rehair” interesting and helpful, kindly share it with someone you know that might need it.