The Complete Guide On How To Draw A Treble Clef

How To Draw A Treble Clef
We can actually know how to draw a treble clef in the right way if we really care about the know-how. Absolutely, the ability to draw a treble clef is not magic because we can all learn it with practice.
As we all know, the music clefs is always the first symbol on the music staff. So it is one of the most important aspects of music notation.
In particular, music notes scored on a treble clef staff are commonly used by instruments like violins, flutes, oboes, piccolos, and soprano voices.
This article will properly guide us step by step on how to draw the treble clef properly. But the first thing first. We need to know what is a treble clef that we want to draw.
What is a Treble Clef?

The treble clef has been discussed in the post with the link. But we will still remind ourselves here what the treble clef is and later guide us on how we can easily draw it.
The treble clef is a symbol in musical notation that tells us that the second staff line from the bottom is a note “G”. The treble clef symbol actually curls around the line.
Also, a treble clef is called a G clef probably because it specifies the line that is a note G on the staff.
How To Draw A Treble Clef?
Every one of us that studied music theory in one way or the other has at a particular time drawn a treble clef.
This musical symbol can be difficult to draw at the first attempt. However, with a proper guide and the right approach, we will find it quite easy to draw.
The treble clef can be drawn in different ways and in two defined methods. The first method is a dot method while the second method is a J line method.
The Dot Start Method

We start writing with the dot on the second line and make a curve from the left side of the dot in a clockwise direction.
The curve will touch the third line and then go back to the first line. This is the first curve and it will stop on the first line directly under the dot.
The second curve continues immediately at a point when the first curve stops.
The second curve moves around the dot and the first curve towards the fourth staff line in a continuous clockwise direction.
It also stops on the fourth line directly on top of the dot.
The third curve starts immediately where the second curve stops. However, it moves anticlockwise and stops a line distance above the fifth staff line.
The fourth curve is a slightly bent line down from the top.
It comes down from where the third curve stops as a straight line till it is a line distance below the first staff line.
Again at this point, it is a slight curve again in a clockwise direction.
This process may be difficult for you at first but with practice, you will always get it right later.
Moreover, if we properly master these steps you will later find out that it is a very simple method to draw a treble clef.
However, let us see what the second method looks like.
The “J Line” Method
This method is what I called the “J LINE” method of drawing a treble clef. It looks simpler and straightforward than the dot start method we describe above.
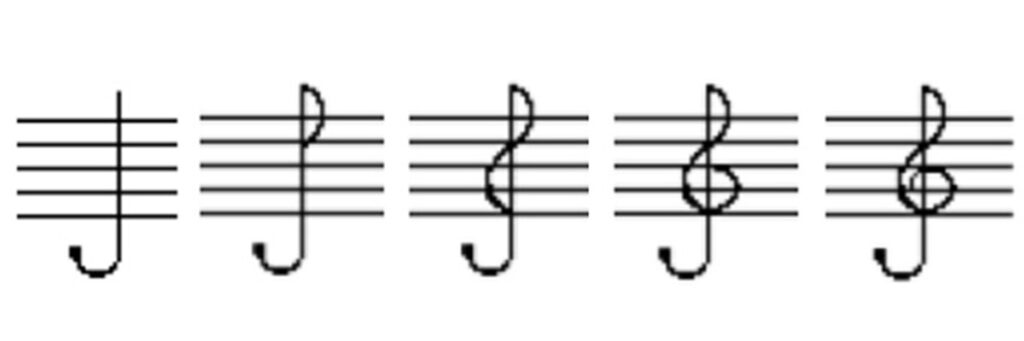
The steps in the diagram above had depicted how to draw a treble clef with the J Line Method. But we will still guide you with the description below on how to do it properly.
“J Line” Method Step by Step Guide
The starting point is to draw a J line across the staff from above to below as shown above. The line starts as a straight line from a line distance above the staff and slightly bends after the last line of the staff.
Then draw a small curve from the top of the “J Line” to the fourth line of the staff. This curve makes the line look like “P” with a smaller curve.
Next, draw another curve that is a little bit bigger from where the “J Line” and fourth line of the staff meets. End the curve at the point where the “J Line” and the first line of the staff intersects.
Ensure the end of the second curve above and the beginning of the second curve blend properly.
Finally, start another curve or let say circle this time from the point you stop from the last step above. Specifically, start drawing a circle where the “J Line” and staff first line cut across.
Let the curve pass through the point where the staff middle (third) line touches the “J Line” and stop on the second line without touching the second curve.
Final Thought On How To Draw A Treble Clef
How to draw a treble clef is definitely simple. However, one may find it difficult to draw without a proper guide like this.
We believe the post is self-explanatory and that you have learned one to two on how to draw the treble clef.
However, if you have any questions related to how to draw a treble clef, kindly ask in the comment section below.
At Phamox Music, we go all out for exactness and honesty. For this purpose, if by any means you found any possible glitch, be it factual, editorial or something that we need to update, kindly contact us.
If you find the information provided in this post How To Draw A Treble Clef interesting and helpful, kindly share it with someone you know that might need it.